How To


Install
Hawk pads
Our standard installation procedures are outlined below, and should be followed in accordance with the application-specific brake pad installation instructions provided by the vehicle manufacturer.
Brake Pad Installation Procedure
- Install brake pads properly. Be sure pads are securely positioned in the caliper.
- Check Brake Fluid. Flush and replace, as needed.
- Check all hydraulic parts for excess wear and tear.
- Check rotor for deep grooves or scoring. Resurface or replace rotor, as needed.
- If rotors do not need resurfacing, then contamination from the previous brake pads must be removed. Sand rotors with 130-grit sandpaper using moderate pressure. Use soap and water to clean rotor surface after sanding. Rotors should be free and clear of oil, grease and brake fluid.
- Inspect calipers for freedom of movement. Lubricate where necessary.
street pad
bed-in
1. To break in the new components, make 6 to 10 stops from approximately 30 to 35 MPH applying moderate pressure.
2. Make an additional 2 to 3 hard stops from approximately 40 to 45 MPH.
3. DO NOT DRAG BRAKES!
4. Allow 15 minutes for brake system to cool down.
5. Your brakes are now ready for use and can be driven normally.


motorsport pad
bed-in
1. After reaching medium speed engage brake pedal to slow car without coming to a complete stop. Release pedal quickly and do not drag brakes. Repeat four or five times.
2. At higher speeds engage brake pedal to slow car without coming to a complete stop. Release pedal quickly and do not drag brakes. Repeat five times.
3. At or near race speed engage brake pedal to slow car without coming to a complete stop. Release pedal quickly and do not drag brakes. Repeat three times. Allow a few seconds between brake engagements while car is in motion.
4. Do not hold brake pedal. Park car for approximately 20 minutes or until brake rotors are completely cool to the touch.
5. If during the above steps the brake pedal becomes soft or brake fade is noticed, park the car immediately for approximately 20 minutes. Do not hold brake pedal.
IMPORTANT REMINDERS WHEN BURNISHING/BEDDING BRAKE PADS
- Do not attempt to use badly worn or damaged rotors with new brake pads.
- Do not drag brakes while car is moving during break-in procedure.
- Do not engage pedal while car is stopped at any time following the break-in procedure.
- Upon completing the procedure, allow the brake system to completely cool before racing.
- Applying the pedal a few times before the start of the race will allow the brake pads to heat up before attempting to reach race speeds.
- Clean a used rotor surface with fine sand paper or steel wool, rinse with water, dry and install before bedding new pads.
- Some forms of racing don’t allow time for the proper break-in procedure to be performed. However, it is still very important to attempt to perform at least the core of the procedure: Build up heat slowly and allow the system to completely cool down before racing if possible.
Motorcycle pad
Bed-In
Warning – New brake pads can take up to 200 miles to completely bed-in, so avoid extreme braking until the pad and rotor achieve sufficient surface contact.
Motorcycle Metallic Bed-In Instructions
1. After installing new brake pads, make 10 stops from 30 mph to 15 mph.
2. Make an additional 10 stops from 50 mph to 15 mph, with as little time between stops as possible.
Motorcycle Organic Bed-In Instructions
1. No special bed-in required, but still avoid extreme braking for first 200 miles.
TALON ROTORS
Install and Bed-In
IMPORTANT - This installation guide is for reference only, and should NOT be relied upon to install your new brakes. Installation should be followed in accordance with application-specific brake rotor instructions provided by the vehicle manufacturer.
Brake Rotor Installation Procedure:
- Remove old brake rotor
- Clean hub flanges of any grease, dust, rust or other contaminants
- If rotor replacement includes wheel bearing service, be sure to pack, install and adjust the wheel bearings and seals, per manufacturer’s instructions
- Rotors are ready for installation out of the box, no additional machining is needed
- Be sure to install the rotors on the correct side of the vehicle (see diagram)
- Use a torque wrench when installing the rotor
- DO NOT USE BRAKE CLEANER
- Replace brake pads with new Hawk Performance brake pads
- Be sure all caliper components are in good condition. If any parts are seized or damaged, replace them before reinstalling calipers
- Lubricate any slider bolts or bushings with hi-temp disc brake grease
- When reinstalling the wheels, torque the lug nuts using a torque wrench, not an impact gun
Bed-In Procedure:
- Avoid heavy braking from high speeds or coming to a complete/abrupt stop until the full bed-in procedure steps are completed
- Perform 10 to 20 stops from 50 MPH down to 15 MPH, allowing brief cooling time between each stop, allowing brake pads and rotors to create an initial friction material transfer layer
- During this initial break-in period, pad noise and slight brake pedal vibration may be experienced
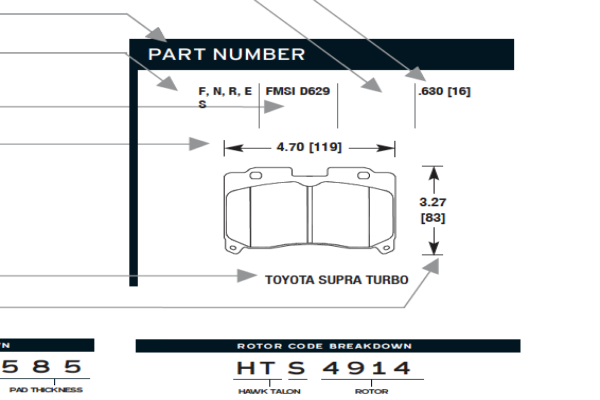
Hawk Part Number
What Does It Mean
It's not always easy to decipher what a part number says about a product, so here's an easy guide to follow!